GW has released the latest Tau models, and with them has come a stark shift in color scheme from the old tan and brown palette. Recreating the new white, red and black theme is a snap, if you know where to start.
For this tutorial, we'll be using the finecast commander model, as most of the new units released are mech suits of one size or another. Follow this guide, and you'll be able to paint your force from the smallest stealth suit to the massive Stormsurge.
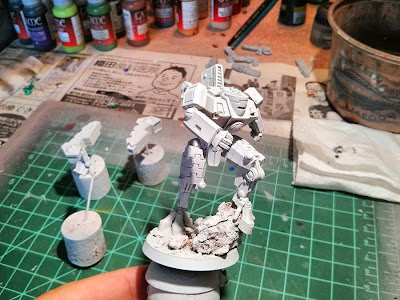
Begin by priming the model white using an aerosol primer. Avoid the GW primer - at $15, it is extremely over priced! You can purchase a can of spray primer at most home improvement stores for less than $3. Hold the can 8-12 inches (20 - 30cm) away from the model and spray in quick, sweeping motions to avoid the paint becoming too thick in any one spot.
Because the primary color of this scheme is white, we have complete our base coat in the same step! Congrats, you're off to a great start.
Here I've left off the weapons, jump pack and the head to be painted separately. Sometimes painting in sub assemblies is easier. Assembling the entire miniature and painting is OK too. Whatever works best for you.
Once the primer has dried, paint the black areas of the model. This includes any area of the model that is not armor plated. I've also mixed in a small amount of silver to create a more metallic appearance. Note that I'v also started painting my base.
Next we'll add the red accents. Painting over white will give us brilliant tones that pop, but it's always best to use several thin coats instead of one heavy coat. This allows a smooth finish without streaks or bumps.
Here I've decided to make his right arm and head red, as an accent to the model. You can decide which panels or accents to create.
Once the base colors are complete, it's time to start detailing the model. In this first step, I applied a wash to the recesses and panel lines. This gives the model great depth and accentuates the sculpt. Leaving the model white makes everything look flat and uninteresting.
I use an oil paint wash, as mistakes can be easily wiped away before it dries. But you can use the ink shades from GW. Simply use a small detail brush to paint the shade into the recesses. If you make a mistake, wait for the wash to dry and simply touch up the model with white paint.
The second detail step is adding highlights. To highlight the dark areas, I used a dry brush technique with a mix of silver and black. This makes the high points on the sculpt pop.
To highlight the red areas, I used a mix of red and orange, and carefully edge brushed the panel corners and edges. You can see this along the right shoulder.
The last detailing step is optional. To make the model look like it had some minor battle damage, I painted small chips and dings on the armor panels using a small brush and some dark grey.
Once the detailing was complete, I assembled the miniature!
I hope this guide was helpful. If you have comments or questions, leave them below.
-trip


Nice! I think it looks better with the red accents than just with the small red lines, as Warhammer TV did it. Keep up the good work!!
ReplyDeleteReally really nicely done trip, and a great tutorial I will probably be stealing from :)
ReplyDelete